Tuesday, April 10, 2012

A Few New Projects

Here is a sampling of some other projects I've been working on. Enjoy!


This is an old lamp that was a hand me down from my Grandma. I used a matte red spray paint to paint the base and then covered the lamp shade with jute rope. Make sure if you take a lamp apart to paint you know how it goes back together! 


I have very limited storage in my kitchen so when I saw the inspiration for this measuring cup/spoon storage I knew it would be perfect for my cabinet. The original directions can be found here: http://www.infarrantlycreative.net/2011/08/5-ways-to-organize-with-cabinet-doors.html. I simplified my version but it is still just as effective. All you need are wooden paint stirrers (free from your local hardware store!) and some hooks. Make sure you get hooks that are large enough to accommodate your measuring cups/spoons. This was a very simple project that makes a big difference in your cabinet organization. No more rooting around for the right measuring spoon or cup! 

Thursday, April 5, 2012

Tiered Planter

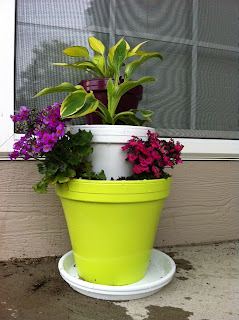
The front flower beds at our condo are pretty much useless these days as we are in the second year of trying to eradicate Lily of the Valley plants that seem to have take over everything. Ugh! I love flowers so I still wanted to have some to dress up our front entryway. I saw inspiration for a tiered planter (http://www.positivelysplendid.com/2010/05/tiered-terra-cotta-planter.html) that I thought I would try.

As I have said before, I love doing projects as inexpensively as possible and using things I already have at home. For me it is that much more satisfying when I know I have re-purposed something that has just been sitting around my house rather than going out to buy a bunch of new supplies.

For this project I started with three terracotta pots, one of which I had lying around in my garage. You want to have varying sizes, one large, one medium, and one small so they will fit inside each other. I got mine at Jo-Ann Fabrics for a couple dollars each. I went through my spray paint collection and settled on three colors that were vibrant enough for spring and summer and went well together. I painted all threes pots and then used a clear acrylic spray to seal them and give a glossy finish to the pots.


After the pots were painted and dry, I got ready to assemble the planter and do some planting! Here is my arsenal of supplies:


I used some some cans and jars from my recycling bin to help stack the pots and then filled in around them with the potting mix. 


Make sure the pots are stable and centered before filling them. Your plants also need to be somewhat small so they fit nicely in the pots. You lose a decent amount of room when you stack them. Mine were a bit large but still worked out just fine. Also, when choosing plants I recommend paying attention to the color and how they will interact with each other and the color of the planters. I chose pink and purple flowers that worked nicely with the magenta purple pot and also some green leafy plants that played off of the green pot. I also try to pay attention to where I am putting those colors. The bright flowering plants went on the bottom and really pop against the green, and the green leafy ones went on the top to contrast with the purple and white. 

The finished result: 


Monday, April 2, 2012

New Life for an Old Mirror

I have had this mirror pretty much my whole life. It started out as a white wicker mirror than was on the wall in my bedroom growing up. When I moved out of my parent's house and got my own place I took the mirror with me. My first revamp of the mirror included adding dowel rods and plywood pieces my Dad cut to cover the wicker, plus some paint. Nearly 5 years later I have decided to give the mirror new life again! Here are some pictures of what I started with:


I was planning to paint the wall the mirror hangs on a burnt orange so the current color of the mirror was not an option. I decided to experiement with a distressed wood look. I painted the mirror frame all white first. I then painted an espresso metallic paint on top. I used a fine grit sandpaper to sand down the brown paint to reveal the white underneath. I am pretty happy with the final result!


Here, is the finished look with a new wall color and new white plates from one of my favorite stores, Home Goods! I love to shop for odds and ends at cheap prices, all of my new white plates were purchased for a total of around $10. Since I used paint that I already had, the mirror revamp was totally free!


Stay tuned for more "Artfully Yours" project ideas! I am collecting photos of some of my recent weekend DIY projects to share soon...

Saturday, January 28, 2012

DIY Shoe Racks

I was inspired by a photo I saw on Pintrest that used wood molding to make shoe racks for high heels (I would credit the original source but none was listed). Since my shoe collection is quite extensive, and I can never have too much shoe storage, I decided to tackle the project.

Supplies: crown molding and base molding cut to the same length, wood glue, and spray paint


You can make them any length depending on the space you have to hang them. I chose to make three smaller racks and they were super easy to put together. All you do is use wood glue to glue the base and crown molding together as shown in the picture below. You can use finish nails to hold the wood in place while the glue dries but I just got creative with propping mine up to dry.


Let the glue dry overnight and then you can paint them. I chose a fun magenta purple because hey, why not?!


When I was ready to hang them, I measured and pre-drilled three holes in each rack. I also pre-drilled holes in the wall and then used anchors and screws to hang them up. I am pretty pleased with the end result!


Sunday, January 22, 2012

Simple Batik Project

While cleaning out my closet this weekend (something I have told my husband I would do when we got married two and a half years ago!) I found this fabric batik:


This is an example from a project I did a couple years ago with an adaptive art class I was teaching at school. While real batik uses hot wax, this one uses white school glue, making it great for younger kids. A piece of canvas fabric or other heavier white or off-white fabric would work best. All you do is draw a design on the fabric with the glue (I would use Elmer's Glue-All) and let it dry overnight. Wherever you put the glue is what will remain white in your design. Once the glue is dry you want to water down some acrylic craft paint and then paint in the design around the glue. Once the paint is dry you wash the glue off in hot water and you are left with the same effect as a wax batik.

This project is great for kids but can also be used to make a table runner or art for your walls. These would look great matted and framed and it is very inexpensive!

Monday, January 16, 2012

Welcome!

Well, I have decided to enter into the world of blogging! I am an art teacher who also has a passion for home decor, party planning, and anything crafty. I take inspiration from everything and love to find creative uses for various objects and materials. I am always working on a project and now I am going to share my latest projects and ideas with you!

Here is a picture of my latest project, a Valentine's Day wreath for my front door.


I have seen a lot of ideas involving yarn wrapped letters so I decided to try my hand at it and turn them into a wreath. I also love using burlap and twine to add a natural element to lots of different projects. This whole project cost me less that $15 in supplies and I love how it turned out!